
I’ve dreamt of running my own home IT infrastructure for years, and I’m thrilled to have finally turned that vision into reality. As any seasoned IT professional will tell you, every great system begins with a rock‑solid network—it’s the very backbone of your entire setup, and getting it right from day one pays dividends down the road.
A few weeks ago, my wife and I moved into a new apartment here in the Netherlands, and with our fresh start came the freedom to build a network that truly fits our family’s needs. From the layout of our switches and routers to the placement of access points, every decision has been guided by performance, reliability, and future growth. Let’s dive into how I designed—and implemented—this home network architecture.
Network Topology
PFsense Router and Firewall
- Uplink from Internet Provider plugged in to ETHx port
- Plugged my laptop directly to ETHx to configure PFsense
- Uplink to the TP-link switch plugged in ETHx.
PFsense Configurations
| Vlan Name | Vlan ID | IP Address |
| Entertainment Vlan | 10 | 192.168.10.X |
| Home Vlan | 15 | 192.168.15.X |
| Proxmox servers | 40 | 192.168.40.X |
| AD(Active directory VLAN) | 50 | 192.168.50.X |
On the Interfaces → Interface Assignments page you map your friendly interface names (WAN, Home_Wifi, etc.) to the actual network devices or virtual sub‑interfaces. Notice how the WAN uses a PPPoE interface on VLAN 6, while all of the home and lab networks are carved out as other VLANs on a single trunk port (igc2). This gives us neat traffic isolation without needing dozens of physical NICs.
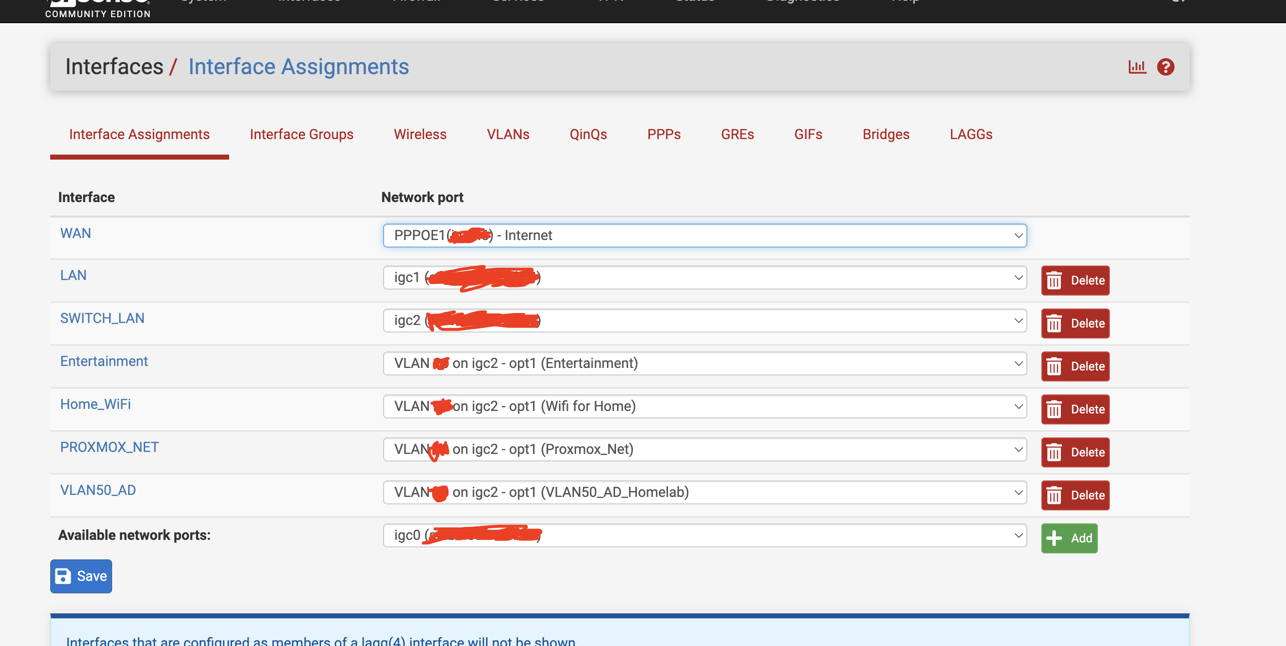
Key design points
- PPPoE on VLAN 6 for your WAN link
- One physical trunk port carrying all your VLANs
- Logical separation: traffic isolation and per‑VLAN firewall/DHCP
Why it matters
- You get strong network segmentation without needing a rack full of NICs.
- Easier firewall rule management (one interface = one policy scope.
Firewall Rules
You can now go to your pfsense rules by going to Firewall >> Rules and set the rules for each interface. This way, you’re able to control traffic for each vlan.
For example, by default, all devices would not be able to reach the internet when they’re connected since the vlan created would not contain any rule for the devices to reach the internet. I have this rule to allow internet access for my proxmox servers:

TP-link switch configuration
Thankfully, my switch is able to create and tag VLANs for traffic.
- Uplink from Pfsense to port 1 of the switch.
- Removed laptop from PFsense and plugged into port 2 of the switch.
- Since the switch has POE for ports 1-4, I connected my TP-link Omada switch to port 3
- Then I connected my Cisco switch to port 5 of the TP-Link switch.
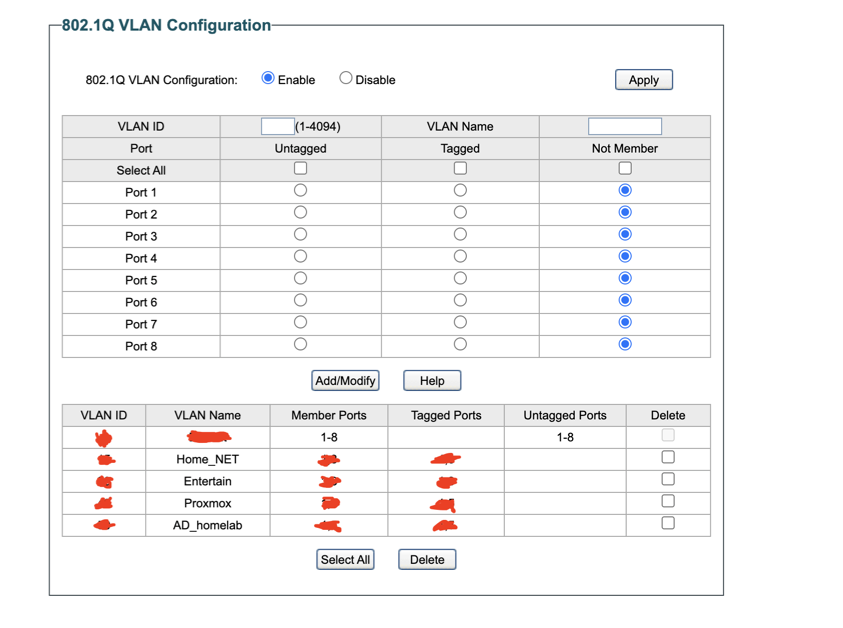
- VLAN 1 (Default) is untagged on every port—any device plugged into ports 2,4,6–8 will simply be on my default network. However, all other ports have been disabled except port 2.
- Port X is my uplink to the router/pfsense: it’s a tagged trunk for VLANs (so the router can route/firewall each one).
- Port X is a trunk for my Home Wi‑Fi and Entertainment VLANs, feeding my wireless AP(TP-link Omada AP).
- Port X is a trunk for my Proxmox and AD‑homelab VLANs, feeding my virtualization host.
- All other ports remain only in VLAN 1 (they’re marked Not Member of the created VLANs).
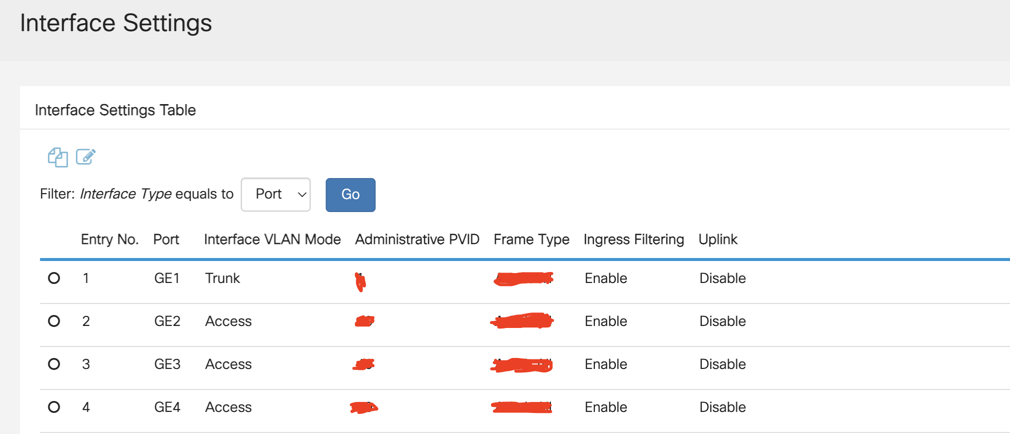
Cisco Switch
- Uplink from port X plugged into port X of the Cisco switch
- Port X is plugged to my Proxmox server
- Port X is plugged to my raspberry pi which is serving has my DNS server(I’m using pihole)
- Port X is plugged to the USB NIC for my windows AD lab
Conclusion
Based on my IT Infrastructure at the new house, I’m now able to segregate my traffic and have proper basic security in place in case of any cyber attacks.
Now, my devices are able to get their IP addresses based on the DHCP server and I gave my critical services a static IP in their different vlans.